The Middlegame
Max Euwe
BOOK ONE: STATIC FEATURES
Part One – Relative Worth of the Pieces
1- The Bishop
2- The Knight
3- The Bishop Pair
4- The Exchange
5- Equivalents for the Queen
Introduction to Parts Two-Five
Part Two – Center Formations
6- Symmetrical Center Formations
7- Positional Preponderance in the Center
8- Pawn Preponderance in the Center
Part Three – Various Formations
9- Closed Formations
10- Open Formations
11- Half-open Formations
Part Four – The Struggle for Open Lines
12- Open and Half-open Lines
13- Opening a File
14- The Minority Attack
15- Controlling the Open File
16- Play on the Ranks
17- The Struggle for the Diagonals
18- Converging Lines
Part Five – Weak Pawns
19- The Isolated Pawn
20- Hanging Pawns
21- The Doubled Pawns
22- The Backward Pawn
BOOK ONE: STATIC FEATURES
Part One
Relative Worth of the Pieces
Values of the Pieces
Pawn = 1
Knight = 3.5
Bishop = 3.5
Rook = 5.5
Queen = 10
How many squares each can pieces attack on an empty board (fewest to most)?
Pawn = 1 – 2
Knight = 2 – 8
Bishop = 7 – 13
Rook = 14 – 14
Queen = 21 – 27
King = 3 – 8
Chapter 1
THE BISHOP
Formerly the Knight was usually given the preference, but nowadays it is the Bishop. However, it is still not possible to assert that a Bishop is in general stronger than a Knight, or visa versa. One cannot even say that a White Bishop is as strong as a Black one, however paradoxical that may seem! There are Bishops and Bishops.
A Bishop which sweeps an important diagonal is more useful than a colleague who lurks in a pocket, looking at his own pawns. We therefore divide this chapter into:
A. The Active Bishop
B. The Bad Bishop
A. The Active Bishop
An active Bishop is essentially a tactical, and therefore temporary, feature of a position, since there will not generally be permanently fixed pawns on the board (this characteristic is not to be confused with the strategic property of the so-called “good” Bishop, which depends on the presence of pawns fixed on squares of opposite color from those on which it moves). The active Bishop occurs frequently in practice, and its owner can for a number of moves dictate the course of the game. He should usually utilize this time to get an attack going.
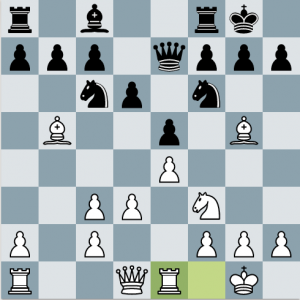
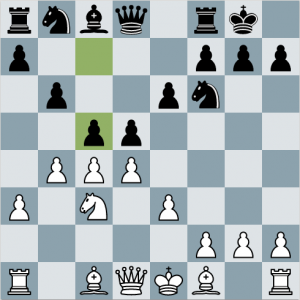
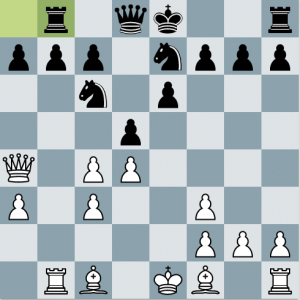
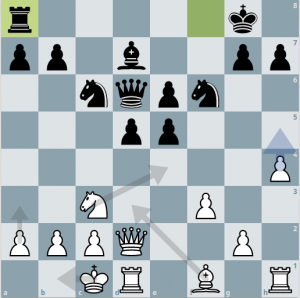
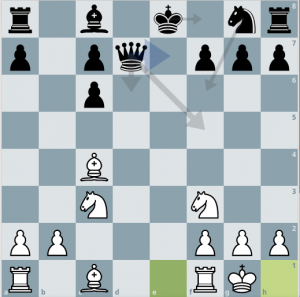
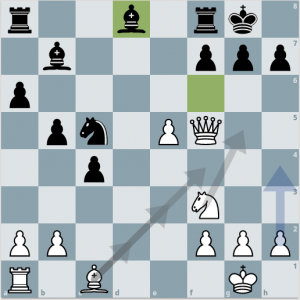
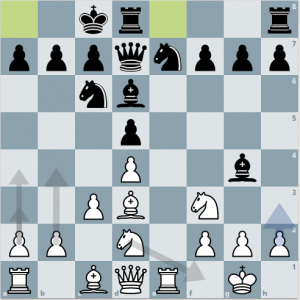
POSITION 1
Alekhine-Junge, Warsaw 1942
The active Bishop puts White in a position to start a Kingside attack
The Bishop is very strongly placed on the diagonal a2-g8, from which it cannot easily be dislodged. Black’s advance …c5-c4 would always allow the Bishop to take up a still stronger post at d5. Yet White must hurry, for his opponent threatens to intercept the Bishop’s line of action by …Nb6-c4.
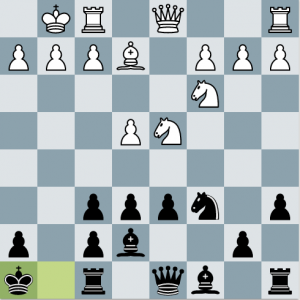
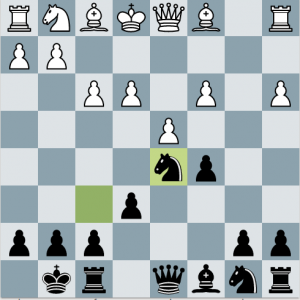
POSITION 2
Pilnik-Kramer, Amsterdam 1950
An active Bishop obtained at the cost of a backward pawn
With his last move (…d5) Black has taken the initiative in the center, and now threatens either to gain space and freedom by …d4 or else to release the tension by …dxe4. Note here that after this latter possibility there still exists an essential difference between this position and position 1. The White Bishop cannot play an active role, since an immediate Bb3 could be answered by …c4. True, after the exchange on e4 Black will have a weak point at d5, which White may eventually exploit by Ne3-d5, but under the circumstances this is less important; this is a subject to be discussed later on.
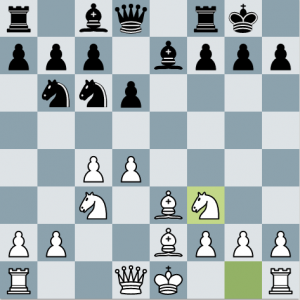
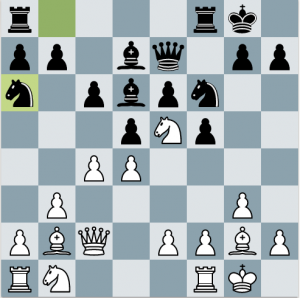
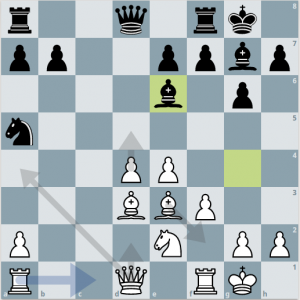
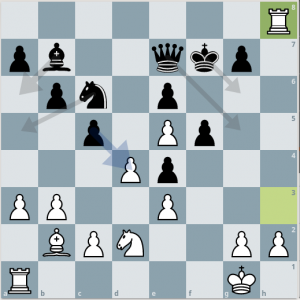
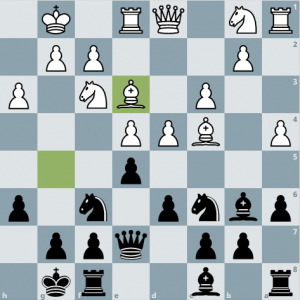
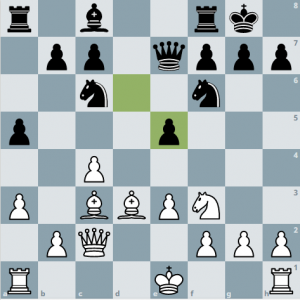
POSITION 3
Euwe-Thomas, Hastings 1934-5
A well-known position from the orthodox Queen’s Gambit Declined
This position, which has occurred hundreds of times in practice provides an excellent example of an active Bishop. The problems facing both players are clear-cut. White must play for a direct attack, to make the most from his temporary advantage. Black still has to solve the problem of how to put his Bishop to work.

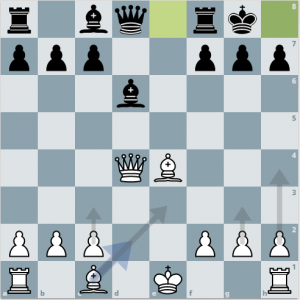
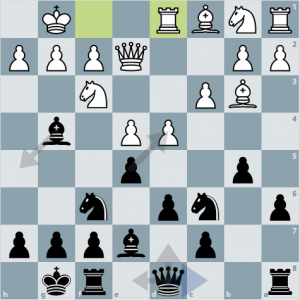
POSITION 4
Stahlberg-Trifunovic, Amsterdam 1951
How the active White Bishop in the orthodox Queen’s Gambit can be rendered harmless by Black.
This position is nearly identical to the previous example, but the one small difference is very important. Black has retreated his Queen to f6 instead of e7. Thus the possibility of his Kingside being broken up by f6 does not arise for the time being, and he can attend peacefully to the problem of his Bishop.
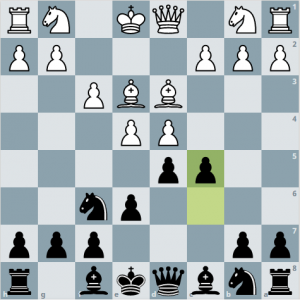
POSITION 5
Poletayev-Flohr, Moscow 1951
An example in which an active Bishop proves too strong for a Knight.
Both King positions are seriously weakened, and but for the presence of minor pieces on the board Black would have the better chances, due to his extra pawn. Yet in the present circumstances the White Bishop is so much stronger than the Black Knight that White has a won game. The Bishop not only shields the weakness of White’s King position, but also lends decisive strength to the attack which follows.
B. The Bad Bishop
When there are various fixed pawns on the board, it is important to have a Bishop which can attack the enemy pawns. This is known as the good Bishop. The advantage is not only that it can threaten the opponent’s pawns, but also that it can move around more easily, its own pawns not being in its way. In contrast with all this there is the bad Bishop.
In view of the above, one might assume that the bad Bishop is a serious disadvantage, which can easily lead to the loss of the game. However, this reasoning is only partly valid. If the bad Bishop is outside its own pawn chain it can often have an important part to play. Indeed, if a bad Bishop has at its disposal a strongpoint inaccessible to hostile pawn attack, it can even happen that the bad Bishop is stronger than the good Bishop.
It order to appraise the value of a bad Bishop in any given position, it is important to consider how much material remains on the board. The weakness of a bad Bishop is highlighted as the endgame approaches. And this brings us to the important conclusion that while the bad Bishop can be quite strong in co-operation with other pieces, its strength wanes as opportunities for co-operation diminish with exchanges or unsuitable placings of the other pieces.
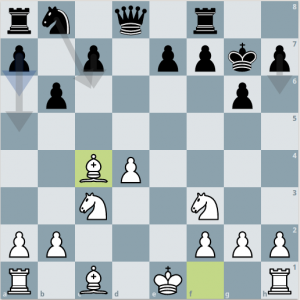
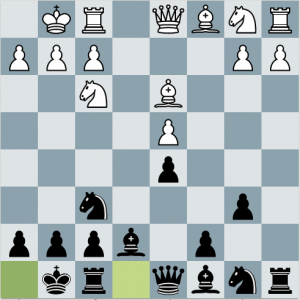
POSITION 6
Zvetkov-Smyslov, Moscow 1947
The bad Bishop inside the pawn chain, and with no support-point.
The White Bishop is inferior to the Black one because of the blocked pawn on d5. The inferiority is not yet decisive, since only one pawn is fixed on the wrong color. We shall now see how Black strives to increase this advantage.
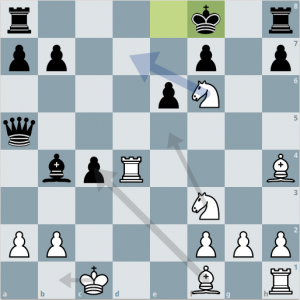
POSITION 7
Botvinnik-Kan, Leningrad 1939
The bad Bishop outside the pawn chain, and in possession of a support-point.
The White Bishop is very bad, since three of his pawns are fixed on his own color. But thanks to the fact that the Bishop is outside the pawn chain, and posted on a square from which it rakes both wings of the enemy position, it is precisely this “bad” Bishop which is White’s winning trump!
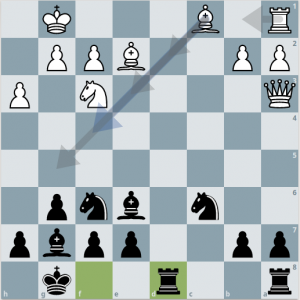
POSITION 8
Keres-Konstantinopolsky, Moscow 1948
The struggle between a bad Bishop outside the pawn chain and a bad Bishop within the chain.
While Black’s bad Bishop has an open diagonal at his disposal, and can play an active game, the White bad Bishop is condemned to a very passive role. It is plain that Black’s advantage in mobility can be exploited only in the middlegame. An endgame might well be drawn, since the Bishops control opposite-colored squares. Black has attacking chances on the Kingside, and we shall see through the presence of the unlike Bishops the pressure on the White position steadily increases.

Chapter 2
THE KNIGHT
In the previous chapter we saw that in an open position a Bishop is usually stronger than a Knight (position 5). When we look for the reason we quickly conclude that the Bishop lends itself better to long-range action, and can conveniently operate against both wings. Against this the Knight is better adapted for close-range work, and is not tied to one color. This explains the fact that in an endgame with all the pawns on one flank a Knight is stronger than a Bishop.
In the middlegame the Knight shows to best (sic) advantage if support-points are available in the central sector. Such strong points nearly always arise from fixed pawns, so that closed positions or half-closed positions favor the Knight.
The location of the support-point is naturally a matter of great importance. Briefly, the possibilities are:
Knight on the sixth rank.
Generally gives a winning advantage. The defender will often be glad enough to liquidate the Knight at the cost of the Exchange.
Knight on the fifth rank.
Gives good attacking chances. Such a Knight is usually stronger than a Bishop.
Knight on the fourth rank.
Not only gives good prospects for an eventual attack, but has defensive value as well.
Knight on the third rank.
Especially useful in blockading enemy passed pawns. Here also the Knight can become active either in defense or attack.
In practice it often happens that the Knight has several support-points at its disposal, and this makes the defender’s task uncommonly awkward, since he has to provide simultaneously against various Knight threats. A knight in such a position is a veritable brigand.
In closed positions a bad Bishop is no match for a Knight, and even a good Bishop often has difficulty in keeping the agile brute under control.
The following examples give a good idea of the strength of the Knight. At the end of the chapter we give a couple borderline cases of the struggle Knight against Bishop, showing how the value of a Knight can be increased out of all recognition in a moment by alteration in the pawn structure.
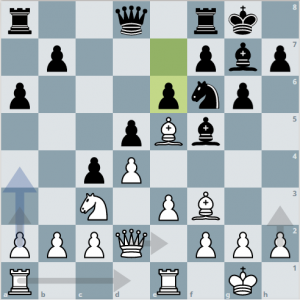
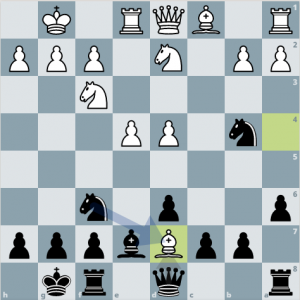
POSITION 9
Guimard-Euwe, Groningen 1946
The Knight has several support-points.
The Black Knight on c5 already stands very well, but if need be it can move via b3 to d4, where under certain circumstances it may be even more active. By contrast, the White Knight has no prospect of improving its position. It could go via b4 to c6, but there it would be virtually out of play, since the pawn position would not allow the other White pieces to cooperate with it.
POSITION 10
Rossolimo-Kramer, Beverwijk 1951
Knight with support-point against good Bishop.
White is handicapped here by his weak e-pawn, and is in no position to render the Knight harmless.
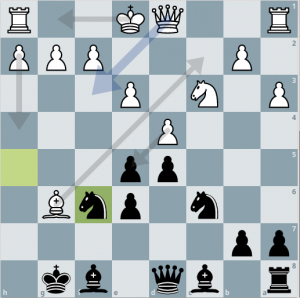
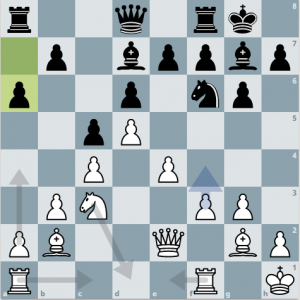
POSITION 11
O’Kelly-Najdorf, Dubrovnik 1950
Knight with support-point against bad Bishop without support-point.
With his last move (Nd5-b5), White gave his opponent the opportunity to have a beautifully posted Knight, a decisive advantage here.
POSITION 12
Michell-Nimzowitsch, Berne 1931
The struggle of Knight against Bishop in an open position.
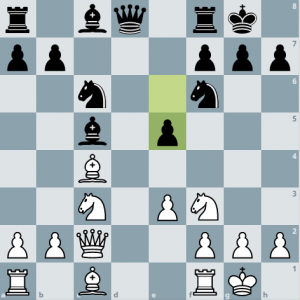
POSITION 13
Flohr-Goldberg, USSR Ch. 1949
A difference of opinion concerning the Knight and the bad Bishop.
In the Russian chess magazine Shakmaty, Flohr commented on this game, and drew attention to a noteworthy difference of opinion. The same position had occurred in the game Kotov-Goldbery, and the continuation was 11.Nd3 Be8. In the post-mortem at the end of the game Flohr contended that White should have exchanged on d7, but both the other masters thought it would have been wrong to exchange the Knight for the bad Bishop. In the present game Flohr seized the opportunity to demonstrate his point of view.
POSITION 14
Henneberke-Kramer, Baarn 1949
A borderline case with bad Bishop outside the pawn chain, against Knight.
White has just played 1.f4, evidently to forestall Black from taking the initiative with …f5. In Chapter 1 we saw that a bad Bishop outside its pawn chain can be a full-strength piece, provided that the other pieces can cooperate well with it. Black could have achieved this here with advantage or with equal chances. Instead Black played…
POSITION 15
Botvinnik-Flohr, 1933
Another borderline case with Knight against Bishop.
The game was adjourned in this position, and it was thought that by 1.Bf3 White might win. Botvinnik demonstrated later, however, that Black would have obtained satisfactory counterplay just as in the actual game.
Chapter 3
THE BISHOP PAIR
A. Two Bishops Against Bishop and Knight
B. Two Bishops Against Two Knights
A clear idea of piece cooperation can be gathered from their use in the endgame for mating an unaccompanied King. With Bishop and Knight this can be quite awkward; with two Knights it is only in exceptional cases possible at all; but with two Bishops it is perfectly simple, as these pieces work together so economically. It is fair to say then that the Bishop pair is a formidable weapon, and further that Bishop plus Knight is stronger combination than two Knights.
In the middlegame, however, there are always circumstances which make a correct estimate of these values difficult or even impossible. This is because of the presence of other pieces on the board, and because of the nature of the pawn position. One thing can be state categorically: in a position with many open diagonals the Bishops can deploy their full powers, and to posses them then will constitute a great advantage – often decisive. Bishop and Knight, or two Knights, in general have chances against two Bishops only as the position takes on a more or less closed character, or in which the availability of support points plays a great role. But even in these favorable circumstances the player with two Knights, or Bishop and Knight, must be continuously on the alert. What frequently happens is this: the player with the Bishop pair runs into difficulties, but nevertheless wins or draws in the end because the opponent at some stage has to open the position in order to play his trumps, thus allowing the Bishop pair to employ their alarming activity.
From the forgoing it is evident that the possessor of the Bishop pair must aim at open play. To this end a pawn sacrifice may be called for, and even an Exchange sacrifice may have surprising possibilities. This last method of unleashing the full strength of the two Bishops is examined in Chapter 4. It has a close connection with the ability of the Bishop pair to support a passed pawn.
In support of a Queenside pawn majority the Bishop pair can also render yeoman service.
We draw attention to two points:
A- The power of the Bishop pair is shown in its purest form in the endgame, when extraneous effects caused by the other pieces have disappear. It follows that, having the Bishop pair, one need not fear to exchange the major pieces.
B- The advantage of the Bishop pair can often be transformed into some other advantage. By exchanging one Bishop one can, for instance, often leave oneself with the good or active Bishop, or alternatively saddle the opponent with weakened pawn formation.
A. Two Bishops Against Bishop and Knight
POSITION 16
Trifunovic-Van Scheltinga, Amesterdam 1950
The Bishop pair employed to weaken the enemy pawn position.
Since the position is half closed, and since, moveover, the White pawns are somewhat weakened by the doubling on the c-file, Black has some compensation for White’s Bishop pair.
POSITION 17
Smyslov-Botvinnik, Moscow 1948
The Bishop pair is more important than the pawn position.
The strategic situation here is not unlike the that of the previous example – two Bishops accompanied by a weakened pawn position. In what follows we shall see White working logically against the pawn complex while Black aims are opening lines.
POSITION 18
Reshevsky-Van den Berg, Amsterdam 1950
Two Bishops in an open position.
It often happens in the Nimzo-Indian that Black has to concede the Bishop pair to his opponent. In return he usually has the (temporary) control of the crucial square e4, and so can give a half-closed character to the position. In the present game Black lacks this compensation, and this is why White can rapidly go over to the attack.
POSITION 19
Lilienthal-Botvinnik, Moscow 1935
The Bishop pair counterbalanced by a lead in development.
In this Nimzo-Indian position Black has some compensation for White’s Bishop pair in the form of a slight lead in development. Such a lead can always be best utilized by opening the position. It follows that it is usually very difficult to make use of a lead in development as compensation for the Bishop pair, since they also carry most weight in an open position. In the foregoing example we saw that Black’s lead was insufficient, and once it was dissipated the Bishops controlled the whole board. Here, however, the situation is different.
POSITION 20
Rosenthal-Steinitz, Vienna 1873
Systematic use of the Bishop pair.
Steinitz was the first to show a method for the best utilization of the two Bishops. So far as is known, it was in the present game that he first applied the system, and for that reason we should not omit it here.
The theory of Steinitz applies to positions like position 20 – positions which are not closed, but which, on the other hand, are not yet completely open in character. White still has support points at d4 and e5. The cornerstone of the Steinitz system is to deprive the opponent of such support points by means of pawn advances. The hostile pieces will thus be doomed to passivity, and the owner of the Bishop pair should not find it difficult to set a decisive attack in motion. This all sounds very simple to us, but in the lifetime of Steinitz it was by no means so. His contemporaries pointed out the weaknesses which these pawn advances must necessarily create. Only through the games of Steinitz was it realized that such weaknesses are not so serious because two Bishops can cover all the squares, being in this way much more useful for neutralizing weaknesses than two Knights or Knight and Bishop would be.
B. Two Bishops Against Two Knights
POSITION 21
Wolf-Rubinstein, Teplitz-Schonau 1922
The Knights in a closed position.
It is evident that in a struggle against the Bishop pair the two Knights will do best in a closed position such as this one. Moreover, in this case the presence of the support point at f4 is a factor which strongly favors the Knights. The practical outcome of such a position is that White will have to look for a favorable moment to exchange one of his Bishops for a Knight, bringing about a Bishop versus Knight struggle such as we have discussed in Chapter 1.
POSITION 22
Capablanca-Milner-Barry, 1936
The Knights in an open position.
It this position we see two centrally placed Bishops facing two centrally placed Knights. The contrast is obvious. The Bishops would still sweep the center of the board if they stood on h1 and a1, but the Knights must have support points if they are to maintain themselves in play. The support points here are insecure, and are speedily undermined.
POSITION 23
Alekhine-Colle, Baden-Baden 1925
The Knights in a half-closed position.
Chapter 4
THE EXCHANGE
A. Rook against Bishop or Knight
B. Rook against two minor pieces
The advantage of the Exchange is decisive. There can be no two opinions about this, and it is necessary to begin this chapter by stating it definitely.
In practice it is true that the player who is the Exchange ahead may still lose in the end, or only draw, but these are always cases in which the opponent had some compensation for the Exchange. The intention of this chapter is to examine what forms this compensation can take.
We begin with a common method of winning the Exchange. One side manages to establish a Knight on the sixth rank, and to protect it with a pawn. The opponent will usually not be able to tolerate such a Knight crippling his whole game, and unless there is some opportunity of exchanging it he will eventually decide to take it with a Rook. In this case he obtains for his Rook not only the Knight, but also the pawn which guarded it. His material disadvantage is therefore very slight, but he cannot be said to have a full equivalent for the loss of the Exchange (Position 24).
The pawn-equivalent for the Exchange can be reckoned at about one and a half pawns, so that one may say that two pawns will be more than sufficient.
More interesting than material equivalents, however, is the question of positional compensation, which in recent years has attracted a lot of attention from the experts. For instance, the compensation may take the form of a pawn plus an unassailable strong point for the Knight (Position 25) or a pawn plus a preponderance of pawns in the center (Position 29).
In cases of compensation without a pawn, the side weaker in material needs two kinds of advantage in position. The possession of two Bishops is always a dominating factor. Two Bishops plus a protected passed pawn (Positions 26 and 27) or two Bishops plus a weakened enemy King position (Position 28) must be reckoned as full compensation.
This means that the sacrifice of a Rook for a fianchettoed Bishop is always worth considering if it achieves the advantage of two Bishops and at the same time destroys an essential part of the King’s defenses.
We divide this chapter into: A) Rook against Bishop or Knight. B) Rook against two minor pieces. This latter is an important case because it occurs frequently in play. The Rook is no match for two minor pieces, even with the help of an extra pawn. Indeed, if the two minor pieces happen to be the two Bishops, even a Rook with extra pawns will usually not be an equivalent. Our two examples suffice to show that the kind of compensation necessary to give the Rook any chances of success rarely arises in practice. The reason is not far to seek. The player with the Rook will always have lost two of his original four minor pieces, and the chance that the two remaining will be the two Bishops the most valuable form of compensation must naturally be slight; but the chance that the player of the minor pieces will retain two Bishops is correspondingly great. This explains why the owner of the minor pieces will usually do best to play for a direct attack on the King.
A. Rook against Bishop or Knight
POSITION 24
Kramer-Thomas, Utrecht 1949
A pawn is not sufficient compensation for the Exchange.
White wins the Exchange in a familiar manner, by managing to post a Knight on the sixth rank (see introduction to Chapter 2).
POSITION 25
Lasker-Janowski, 1909
A pawn and a strong Knight position for the Exchange.
A Knight in the middle of the board, protected by a pawn and out of range of any enemy pawn, is stronger than a Bishop, and nearly as strong as a Rook (Dr. Tarrasch).
Here Black can soon win the f-pawn, while the d-pawn is also a weakling. All this combined outweighs the Exchange. as the sequel shows.
POSITION 26
Selesniev-Alekhine, Triberg 1921
The Exchange counterbalanced by two positional advantages: two Bishops plus protected passed pawn.
For the Exchange Black will have a whole string of advantages:
a) A protected passed pawn. b) The Bishop pair. c) White’s weak a- and c-pawns. d) The square c5.
According to Alekhine, whose excellent annotations we are substantially following here, these advantages add up to more than the value of the Exchange.

POSITION 27
Lyublinksy-Botvinnik, Moscow 1943
A case similar to Position 26.
We saw in Position 26 that the placing of a Rook at a strongly supported point on an open file gives winning chances, especially if the Bishop pair is retained. In the present case this possibility is in fact Black’s only chance, in view of his seriously weakened pawn position.
POSITION 28 & POSITION 29
When the enemy King’s position has been weakened, the type of Exchange sacrifice which we have been discussing in the last two examples can be rapidly decisive, especially if the outpost on the open file is still deeper inside enemy territory. Here are two supplementary examples from tournament practice.
Najdorf-Trifunovic, 1949
Invasion point on the sixth rank.
Guimard-Michel, Mar del Plata 1949
Invasion point again in the sixth rank.
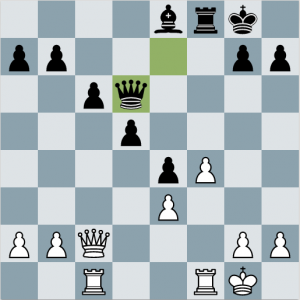
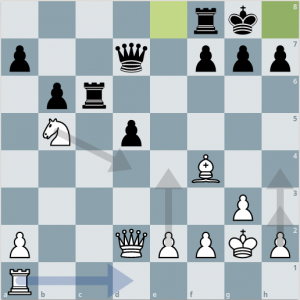
POSITION 30
Bronstein-Boleslavsky, 1950
The Exchange counter-balanced by two Bishops and a weakened Kingside.
In this well-known position the offer of the Exchange by 14.d5 is very strong. The reason is to be found in the following considerations:
1. White gets the Bishop pair.
2. With the disappearance of the Bishop from g7, Black’s …g6 is only a weakening.
3. White has a pawn majority in the center, and this always favors the attacker. Black’s Queenside majority will have more significance in the endgame.
POSITION 31
Bronstein-Stahlberg, Budapest 1950
The Exchange offset by a pawn and a preponderance in the center.
It is a well-known fact that the owner of a strong pawn center often gets automatic attacking chances. The attempt to achieve such a center by an Exchange sacrifice is nothing new, and in practice it has been repeatedly successful. Nevertheless, its correctness must be questioned, as we shall show in the further course of this game.
B. Rook against two minor pieces
POSITION 32
Capablanca-Alekhine, 1927
The minor pieces succeed by playing for the attack.
Black has a pawn as well as a Rock against two minor pieces, but in practice this is seldom enough. It is certain that the minor-piece player must go for the attack, for in that way he will make the most of his advantage. The Rook player will generally welcome exchanges, since it is in an endgame that he will have drawing chances. Position 32 is a classic example of the proper use of the minor pieces.
POSITION 33
Tartakower-Bogolyubov, Bled 1931
The minor-piece side posses two Bishops.
White has Rook and two pawns against two minor pieces; moreover, Black’s Kingside is completely demolished. One would think that White must have more than sufficient compensation. There is nevertheless one factor in the position which will make White’s game very difficult namely, Black’s two Bishops.
Chapter 5
EQUIVALENTS FOR THE QUEEN
A. Queen against two minor pieces
B. Queen against three minor pieces
C. Queen against Rook and Bishop or Rook and Knight
To the question of how many pieces the Queen is worth, no conclusive answer can be given, since so much depends on the nature of the position.
In the endgame it is demonstrable that the Queen cannot win against two minor pieces, apart from some exceptional cases. The strength of the Queen consists in her mobility, and the consequent facility with which she wins material by checking. When there is little or nothing left to be won this mighty piece suffers a decrease in strength.
We have divided this chapter into:
A. Queen against two minor pieces.
B. Queen against three minor pieces
C. Queen against Rook and Bishop or Rook and Knight.
D. Queen against two Rooks.
Against two minor pieces the Queen ought to win, but she can only be in one place at a time, and so has to put all her agility into the fight. The Queen is not happy in defense, which explains the fact that once in a while she will get the worst of it against two pieces.
On the other hand, the Queen is no match for three minor pieces, especially if the pieces are on the attack. Queen against Rook, Knight and pawn, or Rook, Bishop) and pawn gives something like equilibrium, but in these cases too it is important that the Queen should be able to attack.
Two Rooks are stronger than the Queen if they can cooperate, and if their King is well protected. If these requirements are not fulfilled, however, the Queen is in her element, and this is why in master practice one comes across more examples of the Queen’s advantage than of her disadvantage. The Queen is a particularly dangerous piece if the opposing King’s position is broken open. In such cases the Queen’s checking powers speaks continually, and she usually succeeds in having the last word.
We give two examples of each combination of pieces against the Queen. Our ultimate concern here is the value of the pieces, and not primarily to ascertain what usually happens in practice. If that were the case, the positions of Section C ought to be brilliant wins, as the attentive reader will realize from some of our previous examples (see, for instance, the upshot of Positions 1, 7, and 8 and the note to move 33 of Position 13).
A. Queen against two minor pieces.
POSITION 34
Spielmann-Moller, 1920
The minor pieces have an attack on the King.
Under normal circumstances the two minor pieces will clearly get the worst of it against the Queen; but the purpose of this example is to show that given favorable conditions the minor pieces can make things very difficult – so difficult, indeed, that the Queen may even have to pay the piper.
Here White has some lead in development, while the enemy King must stay in the middle for the time being. To make use of these factors, White must attack at once.
POSITION 35
Marshall-Halper, New York 1941
The minor pieces include two Bishops, and they have an attack on the King.
The situation is now somewhat as in Position 34, but the game is more open, so that the Bishops come into their own all the better. For Black it is now essential to finish development.
B. Queen against three minor pieces.
POSITION 36
Kmoch-Prins, Amsterdam 1940
A well-known possibility in the Grunfeld Defense.
White dominates the game. An examination of the position reveals that Black can undertake nothing, while his own position is beset with perils.
It is noteworthy that it is the weakening produced by the fianchetto which particularly hampers him. If only the b-pawn were unmoved, his game might yet be tenable.
POSITION 37
Fine-Grunfeld, Amsterdam 1936
The player with the Queen has his King in an unsafe position.
Due to the insecure Black King, the minor piece player here has a very favorable game, if not an outright win.
C. Queen against Rook and Bishop or Rook and Knight.
POSITION 38
Najdorf-Ragozin, Saltsjobaden 1948
The Queenless side has a positional advantage.
Rook, Knight and pawn generally mean full compensation for the Queen. In the present case there is a little positional advantage as well, consisting of a lead in development sufficient at least to ensure the advance of Black’s center pawn. The extra freedom of movement which must result from this gives Black the better chances.
POSITION 39
Euwe-Grunfeld, Zandvoort 1936
The owner of the Queen is on the attack.
Here, in contrast with the previous position, the respective chances are sharply defined. White must attack the King, helped by his pawn on e5; Black must make use of the d-file and his Queenside pawn majority. His possession of the outpost at d3 is obviously an important trump.
D. Queen against two Rooks.
POSITION 40
Janowski-Lasker, 1909
The Queen on the attack.
It is true enough that two Rooks are generally stronger than the Queen, but in positions where the player with the Rooks has his King exposed, so that it can be checked from left and right, things are different. The Queen’s great mobility gives her all sorts of chances.
In Position 40 the pawn on f6 guarantees White a winning advantage.
POSITION 41
Euwe-Rubinstein, Mahrisch-Ostrau 1923
The Rooks on the attack.
To show their full strength, Rooks must cooperate, and this cooperation is not apparent in Position 41. However, White is threatening to bring it about by bringing his Queen Rook to f4.
Introduction to Parts Two-Five
The French chess master and musician, Philidor, who lived in the eighteenth century, once said that pawns are the soul of chess. Since his time nearly two centuries have gone, but however much the theories of chess strategy and tactics change their ground, Philidor’s dictum is as true as ever. Indeed, so important are the pawns that we are devoting all the rest of this volume to the study of pawn formations. We shall break down these pawn formations into various categories.
First we shall study positions with center pawns. In Part II we examine one by one all the various central pawn configurations, bearing on the our central squares e4, e5, d4, d5.
In Part III we review positions in which pawns not placed in the center are involved. Naturally, this will cover a great deal of territory.
In Part IV we analyze positions in which there is a struggle to obtain and control open lines. This will depend heavily on the particulars of both side’s pawn formation.
Finally, in Part V we discuss various “sub-structures” of pawn formations- e.g. isolated, doubled, or hanging pawns. Often such structures are weak or at least vulnerable, yet fairly often there will be countervailing tendencies which provide various degrees of compensation to their owner. The peculiarities accompanying these various formations can provide opportunities to their pieces in terms of open lines or control of important squares.
In what follows the reader will notice that we repeatedly mention support-points. Therefore we shall delineate what qualities a support-point must possess:
1) It must possible to post a piece there.
2) It must be protected by at least one pawn.
3) No enemy pawn should be able to attack it at least not for the time being.
4) Preferably it should be a central square, or else a square in or near the opponent’s half of the board.
We give a simple example: after 1 d4 d5 2.Bf4 the square f4 is not a support-point, for even though White could give it pawn protection by 3.e3, there remains the possibility that the Bishop may be pushed back by …f6 and …e5. If Black replies to 2.Bf4 with 2…f5, then the e5 square does become a support-point.
Part Two
Center Formations
Chapter 6
SYMMETRICAL CENTER FORMATIONS
Symmetrical central pawn formations do not, in general, allow a suitable basis for attacking operations. The reason is that in most cases there will be one or more files which both sides will have to occupy (otherwise the opponent would achieve dominance there), and the result will usually be exchanges with consequent drawish tendencies. Cases in which the equilibrium is decisively altered are not rare, but these would be usually attributable to a lead in development. We now define four forms of symmetrical center:
A. The Vanished Center. (All four center pawns are exchanged off).
B. The Queen’s Pawn Center. (White d-pawn on d4, Black’s on d5).
C. The King’s Pawn Center. (White’s e-pawn on e4, Black’s on e5).
D. The Symmetrical Four-Pawns Center:
(i) with e-pawns forward (White’s e-pawn on e4, d-pawn on d3; Black’s e-pawn on e5, d-pawn on d6).
(ii) with d-pawns forward (White’s d-pawn on d4, e-pawn on e3; Black’s d-pawn on d5, e-pawn on e6).
Of these, D, gives the most chance of play. With the other forms of the Symmetrical center, the major role will be played by some of the factors already mentioned – lead in development, control of open lines, the two Bishops, etc. As the position takes on an open character, the two Bishops can display great activity.
A. THE VANISHED CENTER
The least important form of symmetry in the center is that in which all the center pawns have disappeared-partly because they don’t occur very often, and partly because without center pawns there is not much strategical content to work with. The main actor will be a lead in development or the coordination of the pieces.
We give only one example, while referring the reader to Position 20, which showed the activity of the two Bishops in such positions.
POSITION 42
Chigorin-Forgacs, Nuremberg 1906
The significance of a lead in development.
This example shows in striking fashion how a small advantage can, with exact play, assume decisive significance.
B. THE QUEEN’S PAWN CENTER
(White’s d-pawn on d4, Black’s on d5)
Since each side has a center pawn, there are more strategic possibilities than with the vanished center. In practice, however, this formation doesn’t lead to many chances of a full-bodied conflict, since an automatic exchange of the major pieces typically follows on the one open file. Any attempts to liven up play will have to be taken in the early stages. For either White or Black the advance of the c-pawn may inject some dynamism into the position.
The support-points are at e5 and c5 (e4 and c4 from Black’s point of view); the timely occupation of one of these support-points often is of crucial importance in these positions. For example, if White castles Kingside and Black (in order to sharpen play) castles Queenside, the establishment of a White Knight at c5 followed by pushing the b- and a-pawns, can create a powerful attack. Note that Black’s chances against White’s King on the opposite flank are lessened by the lack of a support point at the corresponding square (f4).
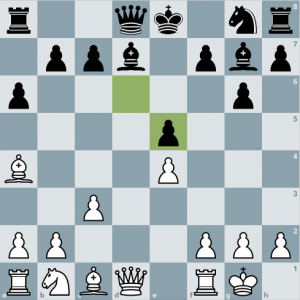
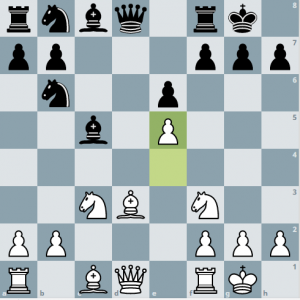
POSITION 43
Maroczy-Spielmann, Bad Sliac 1932
The significance of the support point c5.
The treatment of this opening is an example of how Black can avoid symmetry. The sequel shows, however, that he has pursued the idea too far. He should have castled Kingside.
POSITION 44
Tartakower-Botvinnik, Groningen 1946
Breaking the symmetry by advancing the c-pawn.
In itself the advance of the c-pawn constitutes a weakening of White’s pawn structure. On move 5, Black could have played …dxc4, leaving the d-pawn isolated; but then the White pieces would come into active play.
The further advance of the pawn to the fifth rank could have been reinforced by 7.b4. By move 8, however, this opportunity had already gone, because of the strong reply 8…a5!.
In Position 44 White’s d-pawn is vulnerable, but Black’s c-pawn is no less so..
C. THE KING’S PAWN CENTER
(White’s e-pawn on e4, Black’s on e5)
The e-Pawn center would have precisely the same strategical characteristics as the d-pawn center, assuming that both players have castled Queenside-however, this seldom happens in practice. This is because the open d-file is controlled by the player who first castles Queenside, this making it illegal for the other side’s King to travel over the d-file (of course, there are rare exceptions, which occur when the Player who wants to castle “next” can interpose one of his pieces to block the d-file and allow his King “safe Passage” over the d-file). Consequently, most of the time both players castle Kingside, and this alters the whole aspect of the game.
The typical support-point associated with the e-pawn center is f5 (f4 for Black)-which is a most important base for a Kingside attack (compare Position 43, where the corresponding point c5 with a d-pawn center was used to similar effect).
Furthermore, it is evident that the advance f4-f5 (f5-f4 for Black) will have a much more deadly effect than c4-c5 advance of Section B.
All things considered, the symmetrical e-pawn center gives more fighting chances than the d-pawn center of Section B.
POSITION 45
Fine-Alekhine, AVRO 1938
The advance of the f-pawn.
White leads in development; to make use of this fact he presses on with 10.f4!.
This looks premature, but is in fact very strong.
D. THE SYMMETRICAL FOUR PAWNS CENTER
(i) With e-pawns forward.
(White has pawns on e4 and d3, Black has pawns on e5 and d6).
All the pawns are still on the board, and there is no immediate prospect of large-scale exchanges. As a result, both sides have chances of devising a plan of attack, the basis of which will be either:
(a) The advance of the d-pawn, or
(b) The advance of the f-pawn.
The first named of these possibilities seldom occurs during the middlegame stage. Moreover, the advance of the d-pawn leads either (after dxe5, dxe5) to the e-pawn center, which we have just discussed in Part C; or else (after d5) to the central oblique blocked formation, which comes up in Chapter 7.
The symmetrical four pawns center usually arises from the classical openings: Giuoco Piano, Ruy Lopez, Four Knights, etc.
POSITION 46
Sir George Thomas-Rubinstein, Hastings 1922
Black prevents the advance of the f-pawn.
(ii) With d-pawns forward.
(White has pawns on d4 and e3, Black has pawns on d5 and e6).
This formation has a more lasting character than that of Section D (i), and is also more important in modern practice. The advance e4 (e5 for Black) is generally much more difficult to achieve than was d4 (d5) in the previous formation, so that in the symmetrical four pawns center with the d-pawns forward, the emphasis is on the advance c4 (c5), and thus the main struggle often shifts to the Queenside. For tactical reasons, however, c4 usually occurs on one of the earliest moves so as to make it difficult for Black to develop his Queen Bishop.
This is the logical basis of the Queen’s Gambit. With the formation: White pawns on c4, d4, and e3, against Black pawns on d5 and e6, Queenside operations are in the offing.
Thanks to the advances of theory, the handling of such positions is to be considered more of an opening problem. This is likewise true for the Colle Opening, which aims at the advance e4.
We content ourselves with a single, rather unusual example.
POSITION 47
Torre-Yates, Baden-Baden 1925
Black prevents the advance of the f-pawn.
Before advancing with e4, White forces his opponent to weaken his pawn structure.
The formations of this chapter do not lend themselves very well to general discussion. Anyone who has thoroughly grasped the principles involved in Positions 43 and 44, for instance, may still not be capable of playing the Exchange Variation of the French Defense in irreproachable style. The incidental details of the position may have more influence on the course of play than the symmetrical d-pawn center will. A thorough mastery of the French Exchange Variation would involve study of a very large number of illustrative games; this variation, which occurs only sporadically, does not warrant such intense effort. The same consideration goes for most of the formations of Chapter 6, which, in comparison to other chapters may seem to have received only superficial treatment. We have given them attention in more or less proportion to their occurrence in practical play.
Chapter 7
POSITIONAL PREPONDERANCE IN THE CENTER
We make a distinction between material and positional preponderance in the center. Material preponderance denotes that one side has more center pawns than the other, while positional preponderance is equivalent to superior freedom of movement. Consequently, White (for convenience, we are assuming that it is White who has the initiative as is usually the case) will have more opportunities of posting his pieces to advantage. We consider here three cases:
A. White has at least one center pawn on the fifth rank.
B. White has both center pawns on the fourth rank. Black has one on the fifth.
C. White has only one center pawn on the fourth rank. Black has none.
The subdivisions are as follows:
(i) Advanced Fixed Single-pawn Centers
(a) The e-pawn forward. (White pawn on e5, Black pawn on e6; the d-file open).
(b) The d-pawn forward. (White pawn on d5, Black pawn on d6; the e-file open).
(ii) Central Blocked Oblique Formations
Here we are concerned with positions without neighboring open files, e.g. White’s pawns on d4, e5; Black’s pawns on d5, e6 (see Part Three).
(i) The Tension Form. (White’s pawns on e4, d4; Black’s pawns on e5, d6).
(ii) Miscellaneous Partly Fixed Formations.
(i) The Incomplete e-pawn Center. (White pawn on e4; Black pawn on e6; with Open d-file).
(ii) The Incomplete d-pawn Center. (White pawn on d4; Black pawn on d6; with open e-file).
(iii) The Half Center
Here we are concerned with such positions as White pawn on d4; Black pawn on e6. (See Part Three).
In this part, as already stated in the introduction to Chapter 6, we deal with positions in which the accent is on happenings in the central sector. In the formations A (ii) and C (iii) this is not the case, and this is why discussion of these positions is deferred to Part Three.
We shall now take a closer look at the formations with the help of typical examples from actual p ay, but first one preliminary general point. The side possessing the greater freedom of movement should avoid exchanges whenever reasonably feasible. Thus in these positions White should to k as many pieces as possible on e b0 . Conversely, Black will try to trade a few minor pieces whenever reasonably possible. In this way Black avoids having pieces getting in each other’s way, reserving possibilities for counterplay at a suitable moment.
A. FIXED FORMATIONS
(i) Advanced Fixed Single-pawn Center.
(a) The e-pawn Forward
This formation is usually very favorable for White. If Black has castled Kingside, White can often create a winning attack. The pawn on e5 typically chases off a Knight on f6, normally one of the most important defenders of the Kingside. Also, the strong point at e4 is useful to reinforce the attack in all sorts of ways. Consequently, it is often advisable for Black to castle Queenside. True, this brings dangers of its own (the d6 square is weak), but this is not usually fatal. Black’s chances generally depend on occupying the support-points at d5 and f5; these squares become more and more valuable as pieces are exchanged. The opening of the f-file (by …f6) can also be a valuable resource in some circumstances.
POSITION 48
Euwe-Mattison, The Hague 1928
White’s chances of a direct attack on the king.
An ideal attacking set-up for White. The classic Bishop sacrifice at h7 is already threatened (11.Bxh7+ Kxh7 12.Ng5+ Kg8 13.Qh5, etc.).
POSITION 49
Landau-Reshevsky, Kemeri 1937
A tactical example; Black obtains counterplay by …f6.
Looked at from the strategic point of view, White’s chances are definitely better, since Black’s pawn structure on both wings is compromised. Yet tactically it is another matter, mainly because of the power of Black’s two Bishops and the ability to open the f-file for attack.
(i) Advanced Fixed Single-pawn Center.
(b) The d-pawn Forward
Superficially it might be expected that this formation would show much the same qualities as the previous one. The only difference seems to be that instead of a pawn at e5, there is one at d5, and instead of a support-point at e4, there is one at d4. However, this formation contains considerably different issues, mainly due to the different position of the Kings. In the great majority of cases the Kings will be castled on the Kingside. With the e-pawn center, therefore, White’s main idea was to begin an attack on the enemy King, but with the d-pawn center this idea is secondary. The main stratagem here is to obtain persistent pressure against the Black position.
We now give two classic examples:
POSITION 50
Tarrasch-Marco, Vienna 1898
The technique of siege warfare.
We observe here, not only that the d-pawn cramps the Black game, but also that the pressure is intensified by the f-pawn – so much so that all chance of counterplay by Black is ruled out. Only on the Queenside has he some chance of increasing the space available to him. Dr. Tarrasch felt especially at home in such positions, and he demonstrates the superiority of White’s position with impeccable technique .
POSITION 51
Rubinstein-Nimzowitsch, Berlin 1928
Rubinstein was another master of the art.
This position is similar to the previous one, the only real difference being that a pair of minor pieces have been exchanged. Hence, Black has a little more room in which to maneuver.
B. PARTIALLY FIXED FORMATIONS
(i) The Tension Forms
The tension form (White’s pawns on e4 and d4; Black’s pawns on e5 and d6) presents White with the problem of how to maintain his center and obtain greater freedom for himself by inducing Black to play …exd4. This sort of position is not generally easy to handle. Transpositions into other central formations are frequently possible, and thus both players have to consider, move after move, the pros and cons of various set-ups.
We examine the following possibilities:
1) White plays dxe5. If Black retakes with the pawn, we have the e-pawn center, already dealt with in Chapter 6, Section C. If he captures at e5 with a piece, we have the Ruy Lopez Formation. [see Chapter 10, Section A (i)]).
2) White plays d5. This gives the Blocked Oblique Formation of Chapter 9, Section A (i).
3) White maintains his pawns abreast, and this leads in the long run to Black playing …exd4. Then if White recaptures wit a piece we have the Half-center of Chapter 10, Section A. Very important, however, is the other possibility recapture with a pawn rom c3, leading to the Classical Center, Chapter 8, Section C. This usually has a brief life before Black challenges with …d5, after which a new Tension Form occurs, with the following further possibilities:
(a) White continues with e5, the Spanish Center.
(b) Either White plays exd5 or Black lays …dxe4, leaving the Isolated-pawn Center. Practice has shown that the abandoning of the center by Black’s …dxe4 doesn’t always mean a success for White, particularly if Black has chosen carefully the moment to trade pawns. On the other hand, Black can’t afford to wait too long for the right moment, for if White can get in f4, he will frequently be able to resolve the central situation with great advantage.
A less important version of the Tension Form occurs with Black’s pawns on d5 and e6, and White’s pawns on d4 and e4. To maintain the tension in this case, White has to play f3, but since this weakens the position of the White King, White usually has to protect the e-pawn with a piece, or push it forward, or make the exchange himself. One exception is the gambit variation of the Caro-Kann, and we give one example of this in Position 56.
POSITION 52
Tarrasch-Alekhine, Baden Baden 1925
Black gives up the center at the right moment.
POSITION 53
Reti-Stoltz, Stockholm 1928
Via Tension Form to the Spanish Center.
POSITION 54
Szabo-Euwe, Budapest 1940
The dangerous Kingside pawn majority becomes active.
POSITION 55
Smyslov-Lyublinsky, USSR Championship 1949
The tension protracted as long as possible.
This is a fine example of a position which needs to be played in the “tension” style.

POSITION 56
Tartakower-Sultan Khan, match, 1931
An unimportant version of the Tension Form: the gambit variation of the Caro-Kann.
Strictly speaking we are still in the opening stage; yet already White is experiencing some difficulty in maintaining the tension. The root cause is the weakened diagonal e1-h4.
(ii) Various Partially Fixed Formations.
There are still a few partially fixed formations in addition to the tension forms with which we have been dealing. In play they arise rarely, so we will treat them briefly. Possible forms are:
1) White pawns, d5, with e-pawn on the fourth, third, or second rank; Black pawns on d6 and e7.
2) White pawns, e5 and d3; Black pawns, d5 and e6.
3) White pawns, e5 and d4; Black pawns, e6 and d7. But in most cases these quickly become normal blocked formations, but it does sometimes happen to be more advantageous to maintain the status quo. Here are three illustrations:
POSITION 57
Donner-Van Scheltinga, Beverwijk 1952
White has a crushing advantage in space.
Black aims for Queenside counterplay by playing …b5. Trying to block the center by 14…e5 doesn’t work because of 15.dxe6, leaving Black with a very weak d-pawn.
POSITION 58
Pillsbury-Lasker, Nuremberg 1896
Support point at d4.
In this position White will not even consider playing d4 as his Knight is very well-placed there. This is instrumental for the following spectacular breakthrough.
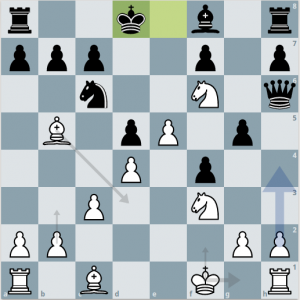
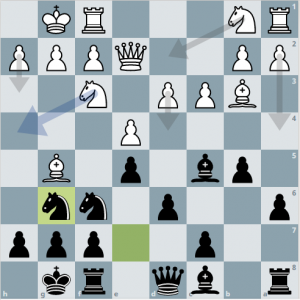
POSITION 59
Colle-Capablanca, Carlsbad 1929
The breakthrough systematically prepared.
The difference between this partially fixed formation and the normal blocked oblique center is that the Black d-pawn stands on d7 instead of d5, and this improves Black’s chances, as d5 is a splendid support-point for his Knight. For the time being White retains some chances of Kingside attack, and his two Bishops may play a useful part; but sooner or later the tide must turn. Black’s strategy includes the opening of the f-file by …f6, but this is not practical yet, for if 21…f6, White replies 22.Qh4 Rf7 23.Bxg6.

C. MOBILE CENTER FORMATIONS
(i) The Incomplete e-pawn Center
We are already aware that the normal e-pawn center (White has a pawn on e4, Black a pawn on e5) with the open d-file gives few dynamic chances (see Chapter 6, Section C). But we have also seen that the advance position, with a White pawn on e5 and a Black pawn on e6, gives White good chances, with the e-pawn itself a vital factor in any attack on the enemy King. The darker side of this set-up (weakening of the squares d5 and f5) becomes important only as the end game approaches (see Chapter 7, Section A).
In the formation now to be considered (White pawn on e4, Black pawn on e6) the possibility of going over into one or another of the above-mentioned formations has to be kept constantly in mind. White naturally wants to push his pawn to e5, to reach formation 7A(i), but this push must be made under favorable circumstances or White may find that it only creates weaknesses at d5 and f5, which might be instrumental for a Black counteraction. Also, the e-pawn, when pushed to e4 unjustifiably, may be considered to be only an obstruction on the important b1-h7 diagonal. Hence, White should think carefully before making the committal advance e4.
POSITION 60
Reshevsky-Rossolimo, Amsterdam 1950
The darker side of the advance of the e-pawn.
Black wants to seize the initiative by pushing this pawn to e4.
POSITION 61
Euwe-Reshevsky Moscow, 1948
The brighter side of the e-pawn advance.
(ii) The Incomplete Queen’s Pawn Center
The incomplete d-pawn center consists of a White pawn on d4 and a Black pawn on d6, with the e-file open. This formation has practical significance only if White also has a pawn on c4. If this is not the case, Black has two possibilities:
1) He can play …d5, making an ordinary d-pawn center, which, as we have seen, gives few opportunities for a vigorous encounter. 2) He can use the d5 square for a piece, and this could give some chances for initiative. For example, we examine the opening of the game Lewitt-Caro, Berlin 1905: 1.e4 e5 2.Nf3 Nf6 3.Nxe5 d6 4.Nf3 Nxe4 5.d4 Be7 6.Bd3 Nf6 7.0-0 Bg4 8.b3 Nc6 9.Bb2 O-O 10.Nbd2 Qd7 11.Nc4 (better was 11.c4) 11…Nb4! 12.a3 Nxd3 13.Qxd3
With a White pawn on c4 Black would not have had this possibility. Then if Black subsequently pushes …d5, White can bypass with c5 while gaining space. If Black refrains from …d5 very long, then White might well be able to push d5, with a gain of valuable central space (see Chapter 7, Section A (i) (b)).
In general it can be said that the incomplete dawn center gives White a slight, but persistent initiative.
POSITION 62
Konstantinopolsky-Panov, Moscow 1946
White plays for constriction; Black seeks freedom.
In this well-known variation of Alekhine’s Defense Black suffers from lack of elbow-room, his pieces tending to obstruct each other. The Knight on b6 in particular has to play a very modest role.